Here at tFS, we have more than a small fascination with nail art. Beyond the standard French manicure or bright spring shade, more intricate nail art has been creeping into mainstream fashion over the past few seasons and specialty manicures are the talk of the town. As wonderful as it would be to have a professional manicurist paint intricate designs on your nails every week, it’s not always an option. Fear not nail art lovers, here is a (relatively) simple, though slightly time consuming, way for you to indulge your nail art fascination at home: water marbling!
Marbled nails have the desired effect of looking incredibly difficult, but with a bit of practice and the how-to below, you will see just how easy it is.
Before you start, get a paper towel or tissue, you’ll need it when you’re marbling. Get a small bowl and fill it with room temperature water. You don’t want the water to be too cold or else the polish won’t spread, or too warm because it will spread too quickly.
- Apply your base coat as usual and one coat of another polish. You want most of your nail color to come from the marbling, but having a colored base often fills in the gaps and results in a brighter manicure.
- Apply clear tape around the tips of your fingers. This is the most time consuming step but it is worth it when you are finished as there is less excess polish. There is some debate as to whether applying oil around your nail works the same way, but I find tape much easier to remove.
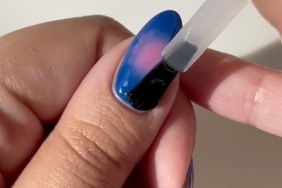
- Carefully drip a drop of nail polish into the water. Repeat with multiple colors to create a bulls eye effect.
- With a pin or toothpick, working quite quickly, swirl the polish to create the desired marble effect.
- Place your nail facing down into the water where you want the design to appear. It is imperative that you keep your nail under water or else the design may shift.
- With your toothpick or pin, clear away the excess polish from the water. It should pull away easily after a few seconds.
- Repeat with all of your nails, remove the tape, and apply topcoat as usual. Note, you may see water droplets trapped under the polish. Most of these will even out with the application of topcoat.
It takes some practice, but with a bit of free time it can result in an amazing nail art effect. See below for my attempt at water marbled nails (as you can see, I keep mine quite short but this effect looks great on longer nails).
Top photo: http://beautylish.tumblr.com