I have a confession to make: I love scrunchies. I said it—the dreaded “S” word, the horror of every self-respecting fashionista who remembers the 90s. But seriously, scrunchies are fun, they put up your hair without creasing it, and the fashion industry has been trying to bring them back for the last couple of years. Marc Jacobs sent chiffon scrunchies down his Spring 2010 runway, Sophie Theallet adorned model’s braided buns with the throwback hair accessory, and American Apparel and Urban Outfitters both sell scrunchies in almost every shade and pattern imaginable. Even stylish celebs like Catherine Zeta Jones, Kate Beckinsale, and Sienna Miller have dared to venture out in scrunchies, even with Hilary Clinton working overtime to give scrunchies a bad name.

Ashish Spring 2013 Runway
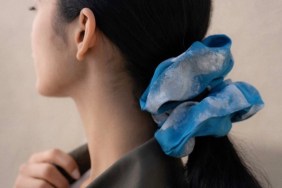
Now that I’ve opened the opened the door for you secret scrunchie lovers, I understand if you still have some hesitation and don’t want to actually shell out for a scrunchie. You’re in luck—scrunchies couldn’t be easier to make yourself. You’ve probably already got a couple of awesome vintage silk scarves languishing in your accessories drawer—their bright patterns are so tempting in the dollar bins at thrift stores but I never really know what to do with them—and with a few simple cuts and stitches you can turn one into a wearable scrunchie. I made a bunch for my friends and gave them as Christmas gifts, and trust me, the ones who are fierce enough to wear them get tons of compliments!
To make a vintage scarf scrunchie you will need:
- One vintage scarf (depending on the size, you can make about 3 scrunchies per scarf)
- Scissors
- About 5 inches of ½ inch wide elastic
- Safety pin
- Sewing machine (you can sew it by hand if you don’t have one)
- Needle & thread in a color that matches the scarf
Step 1: Pick a vintage silk scarf.
Choose a scarf in a small pattern (large patterns will get lost in the scrunch) and colors that will complement your hair. Pick a sturdier silk fabric, preferably with some texture on one side. If it’s see-through, it will probably be too silky to sew easily. I found this awesome Anne Klein art deco geometric print scarf for $3 at a vintage store.
Step 2: Cut out a strip of scarf about 4½ inches wide and 16-20 inches long.
Lay out the scarf and pick a strip that includes the colors or patterns that you want.
Step 3: Sew the strip into a tube.
Fold the strip of scarf lengthwise with the shiny/patterned sides of the fabric (the side you’ll want to see on your scrunchie) facing in. Sew up the side seam of the tube, leaving the ends open. This is incredibly quick with a sewing machine, but you can easily do it by hand. Turn the tube inside out to disguise the seam and show the nice side of the fabric.
Step 4: Insert the elastic.
Slide about 5 inches of elastic into the tube (more if you have thick hair or want a looser scrunchie), holding onto one end while you push the other through. Tip: attach a safety pin to one end to make it easier to push the elastic through the tube.
Step 5: Sew up the ends of the elastic and the scrunchie.
Stitch the ends of the elastic together, then finish the scrunchie by sliding one end of the tube over the other, folding over the top layer to make a little hem and hand-stitching the ends of the scrunchie together. Use small stitches so that they’re not obvious.
Stretch out and fluff the scrunchie to get the desired “scrunched” look and hide the end seam further. Wear your scrunchie in a low, over-the-shoulder pony tail or to embellish a top knot.
Want More? You Might Also Like…
15 Chic and Creative Ways to Tie a Scarf
15 Chic and Creative Hair Accessories to Make
DIY: How to Make a Glam Glitter Clutch
6 Ways to DIY a Scarf Into a Shirt — No Sewing Required